Making Magic In A Cooler – Part 2

Welcome to Part 2 of the Magic Cooler project.  If you missed Part 1, you can read it here. 

Thus far we have focused only on building the AC circuit that will serve to directly control the 10 switchable lights via 10 relays.

Now, we want to hook up the Teensy 3.1 board to control those relays in time to music, and have the Teensy drive the music itself out to a speaker of some sort.  The Teensy 3.1 board uses the Freescale Kinetis K20 microcontoller.

For controlling the relays, I used 10 of the Teensy board GPIOs.   These were configured in software to serve as digital outputs.   Since the relays used negative logic, i.e. a logic 0 activates the relay, the LEDs on the circuit were set up to also use negative logic so that the same GPIO on the Teensy board activates both an LED and a relay.   The LEDs on the circuit protoboard will help in debugging any issues with the relays and give a reminder that the code is running properly.  For this project, pins 13-22 were used for LED/relay control.  (See the board pinout chart here).  Pin 13 also controls an LED directly on the Teensy board– so we have yet another ‘heartbeat’ to remind that the code is running.

The speaker or headphones are connected to one of the PWM-capable outputs of the Teensy.  PWM stands for Pulse-Width Modulation and basically is an output signal that looks like a square wave.  The Arduino IDE tone() function used in the software permits generating a square wave of variable frequency.  When this square wave is applied to a speaker, you get a sound of that frequency!  For this project, PWM-capable pin 23 was chosen for sound output.

The diagram below shows how the Teensy protoboard circuit was wired up.

teensy_circuit

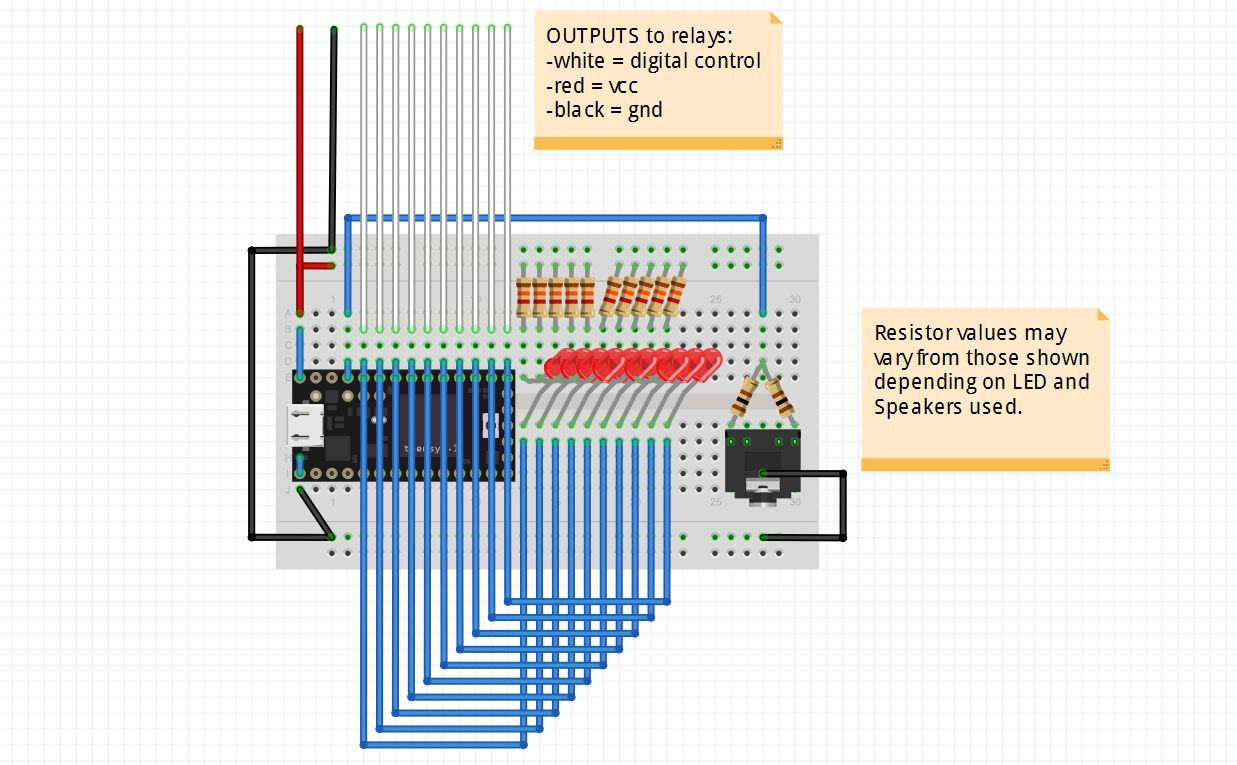
Teensy Circuit Protoboard

Appropriate valued resistors must be chosen for the above circuit depending on the LEDs and speaker used to limit the current through each.   For my circuit, I used 1.3k ohm for the LEDs and 100 ohm for each of the 2 ‘channels’ of the headphone jack.  2 different resistors were connected to each of 2 sides of the jack in order to get stereo sound from the computer speakers.

The top of the circuit diagram above shows the 12 wires that will serve to control the relays:

  • 10x digital logic control of each relay (white)
  • vdd / power (red) (in actuality 2 of these were needed to power the 2 relay boards)
  • ground (black) (in actuality 2 of these were needed to ground the 2 relay boards)

Here is the actual board used:

IMG_20150513_173020

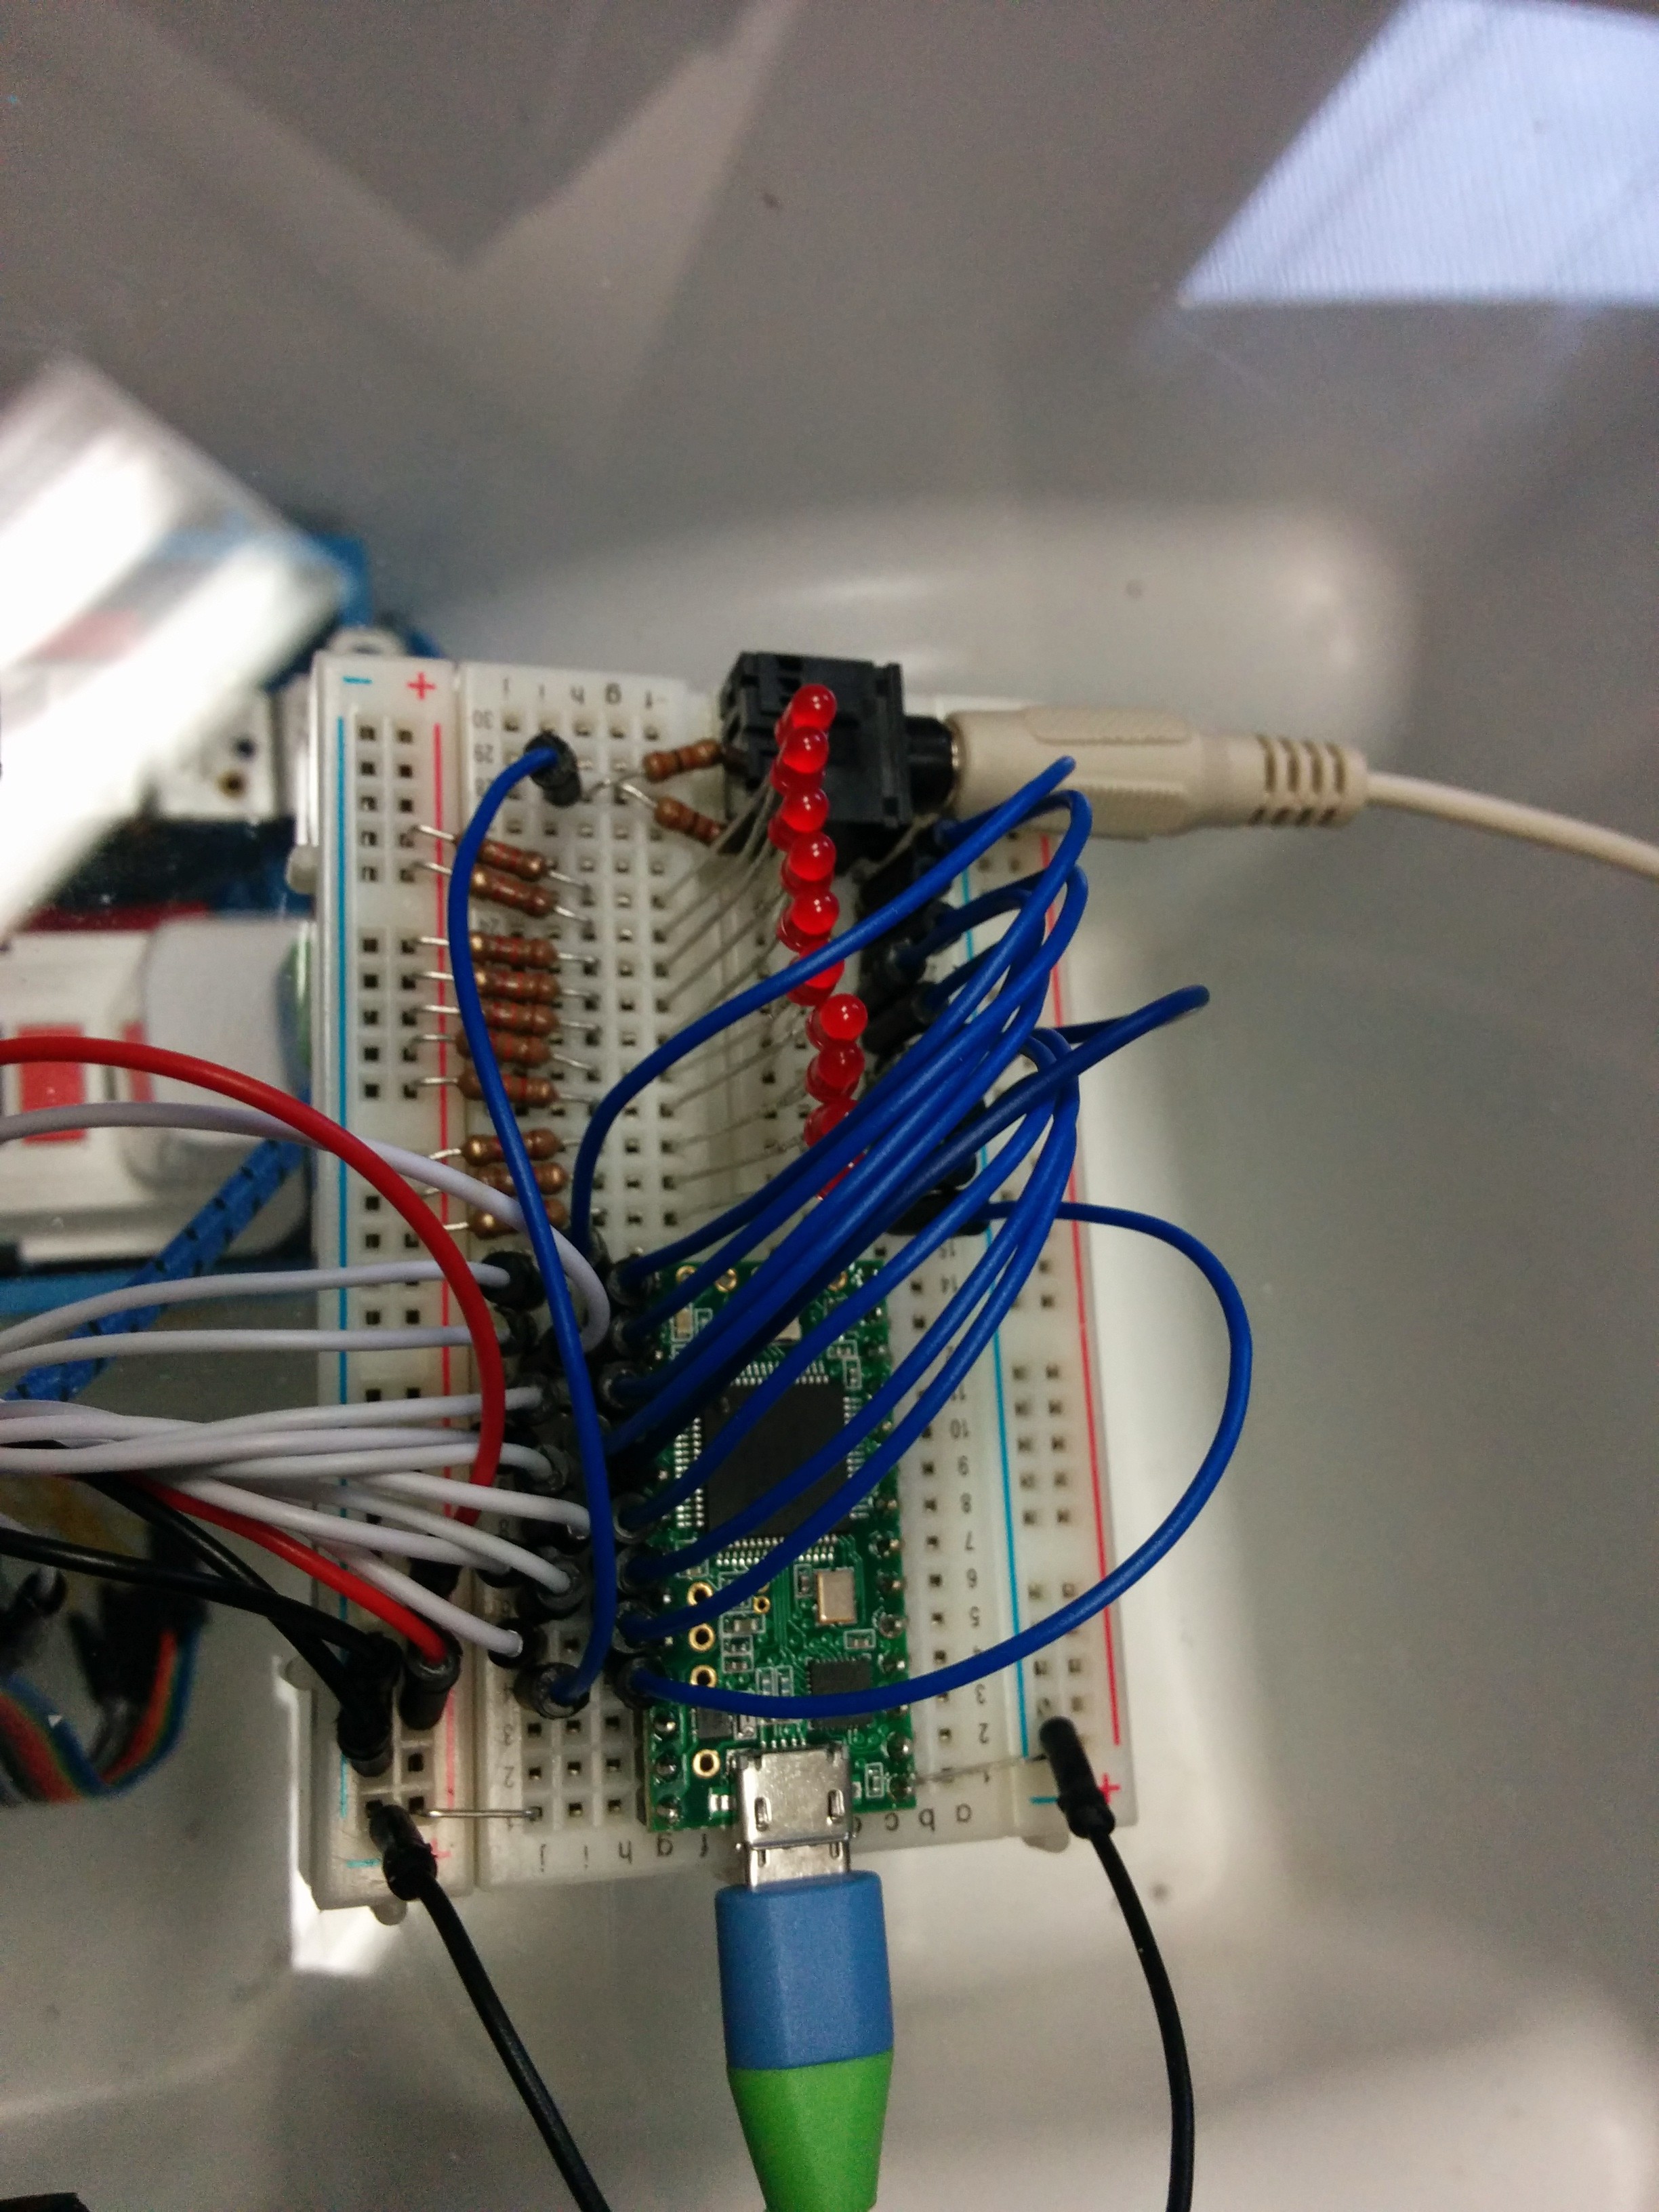
Shown with computer speaker wire connected

The board is powered by a standard micro USB cable connected to a USB AC adapter plugged into the ‘always on’ AC outlet.

Next, we hook up the board to a simple set of computer speakers to make sure it works:

https://www.youtube.com/watch?v=y0DAuEe6r7Q

(In this video you can still see the black speakers we were initially going to use attached to the side of the cooler, but we decided against them at the last minute.  Computer speakers worked out just fine.)

The next step was to hook it up to the relay boards!  The 14 wires had to be ported through a hole in the clear protective guard then through one of the clamp connector holes in the metal junction box.
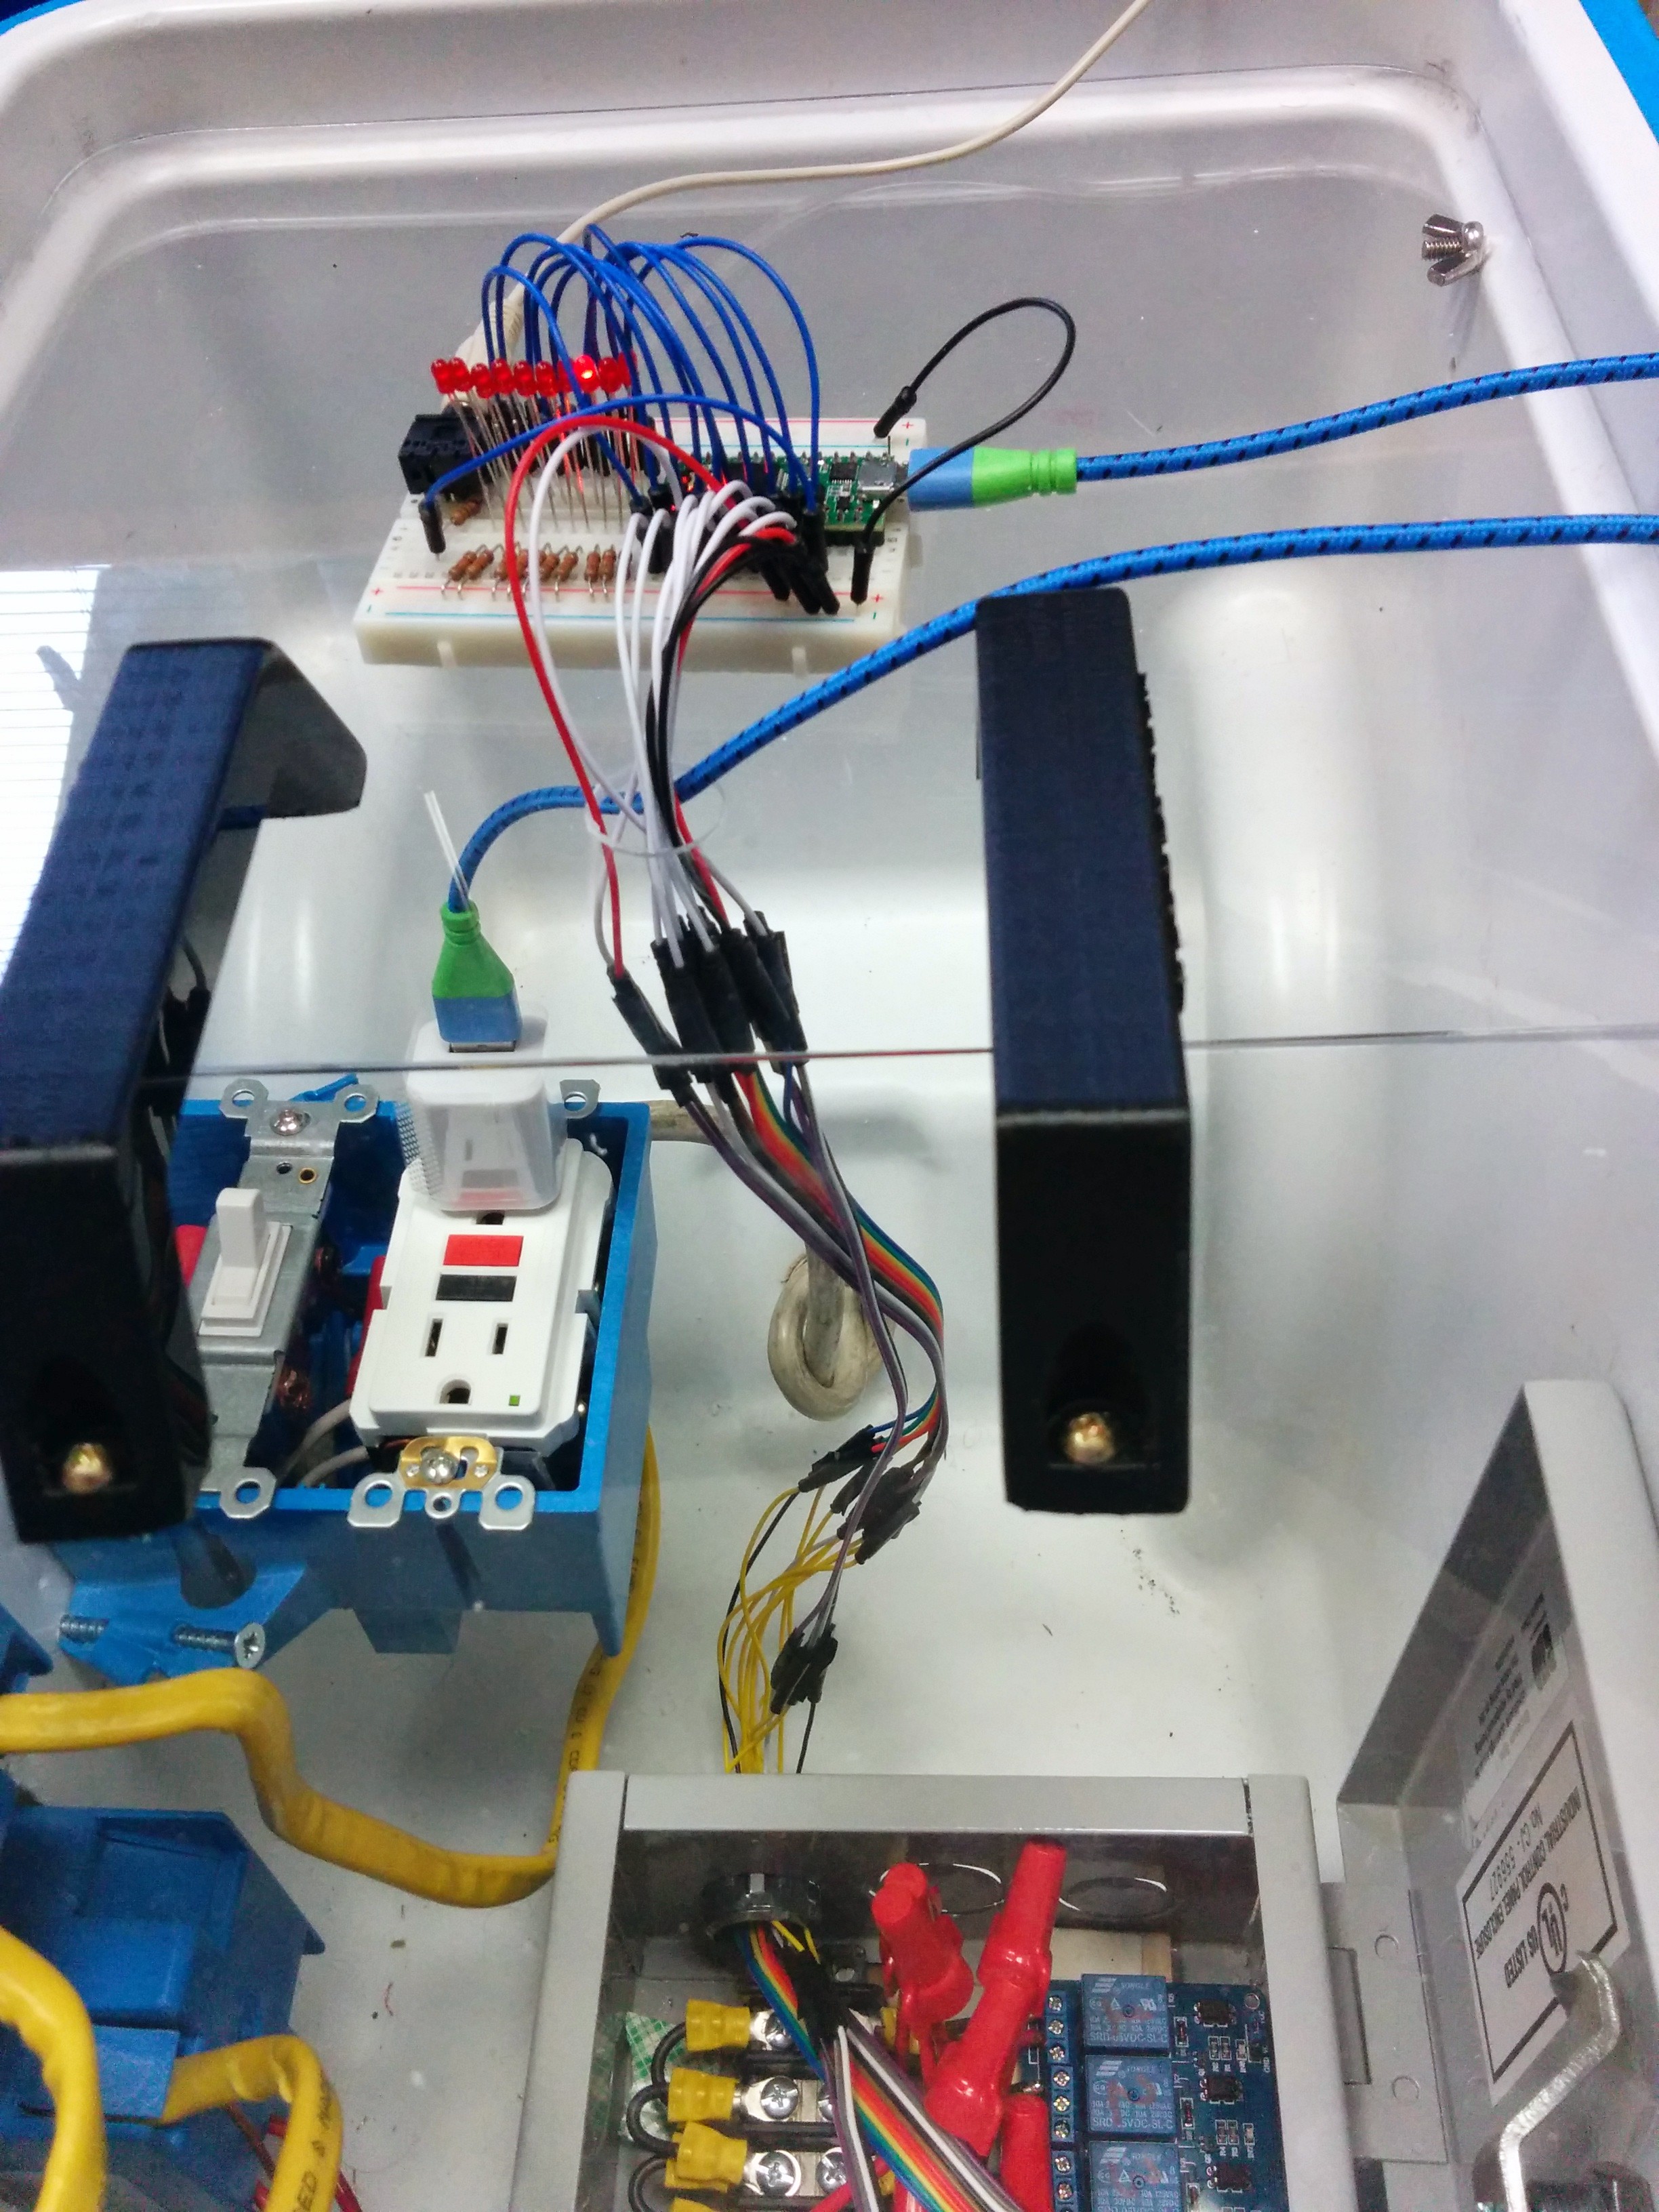
IMG_20150513_172502

Control wires

Once the control wires are in the metal box, they had to be carefully attached to the control, supply and ground pins of the 2 relay boards.
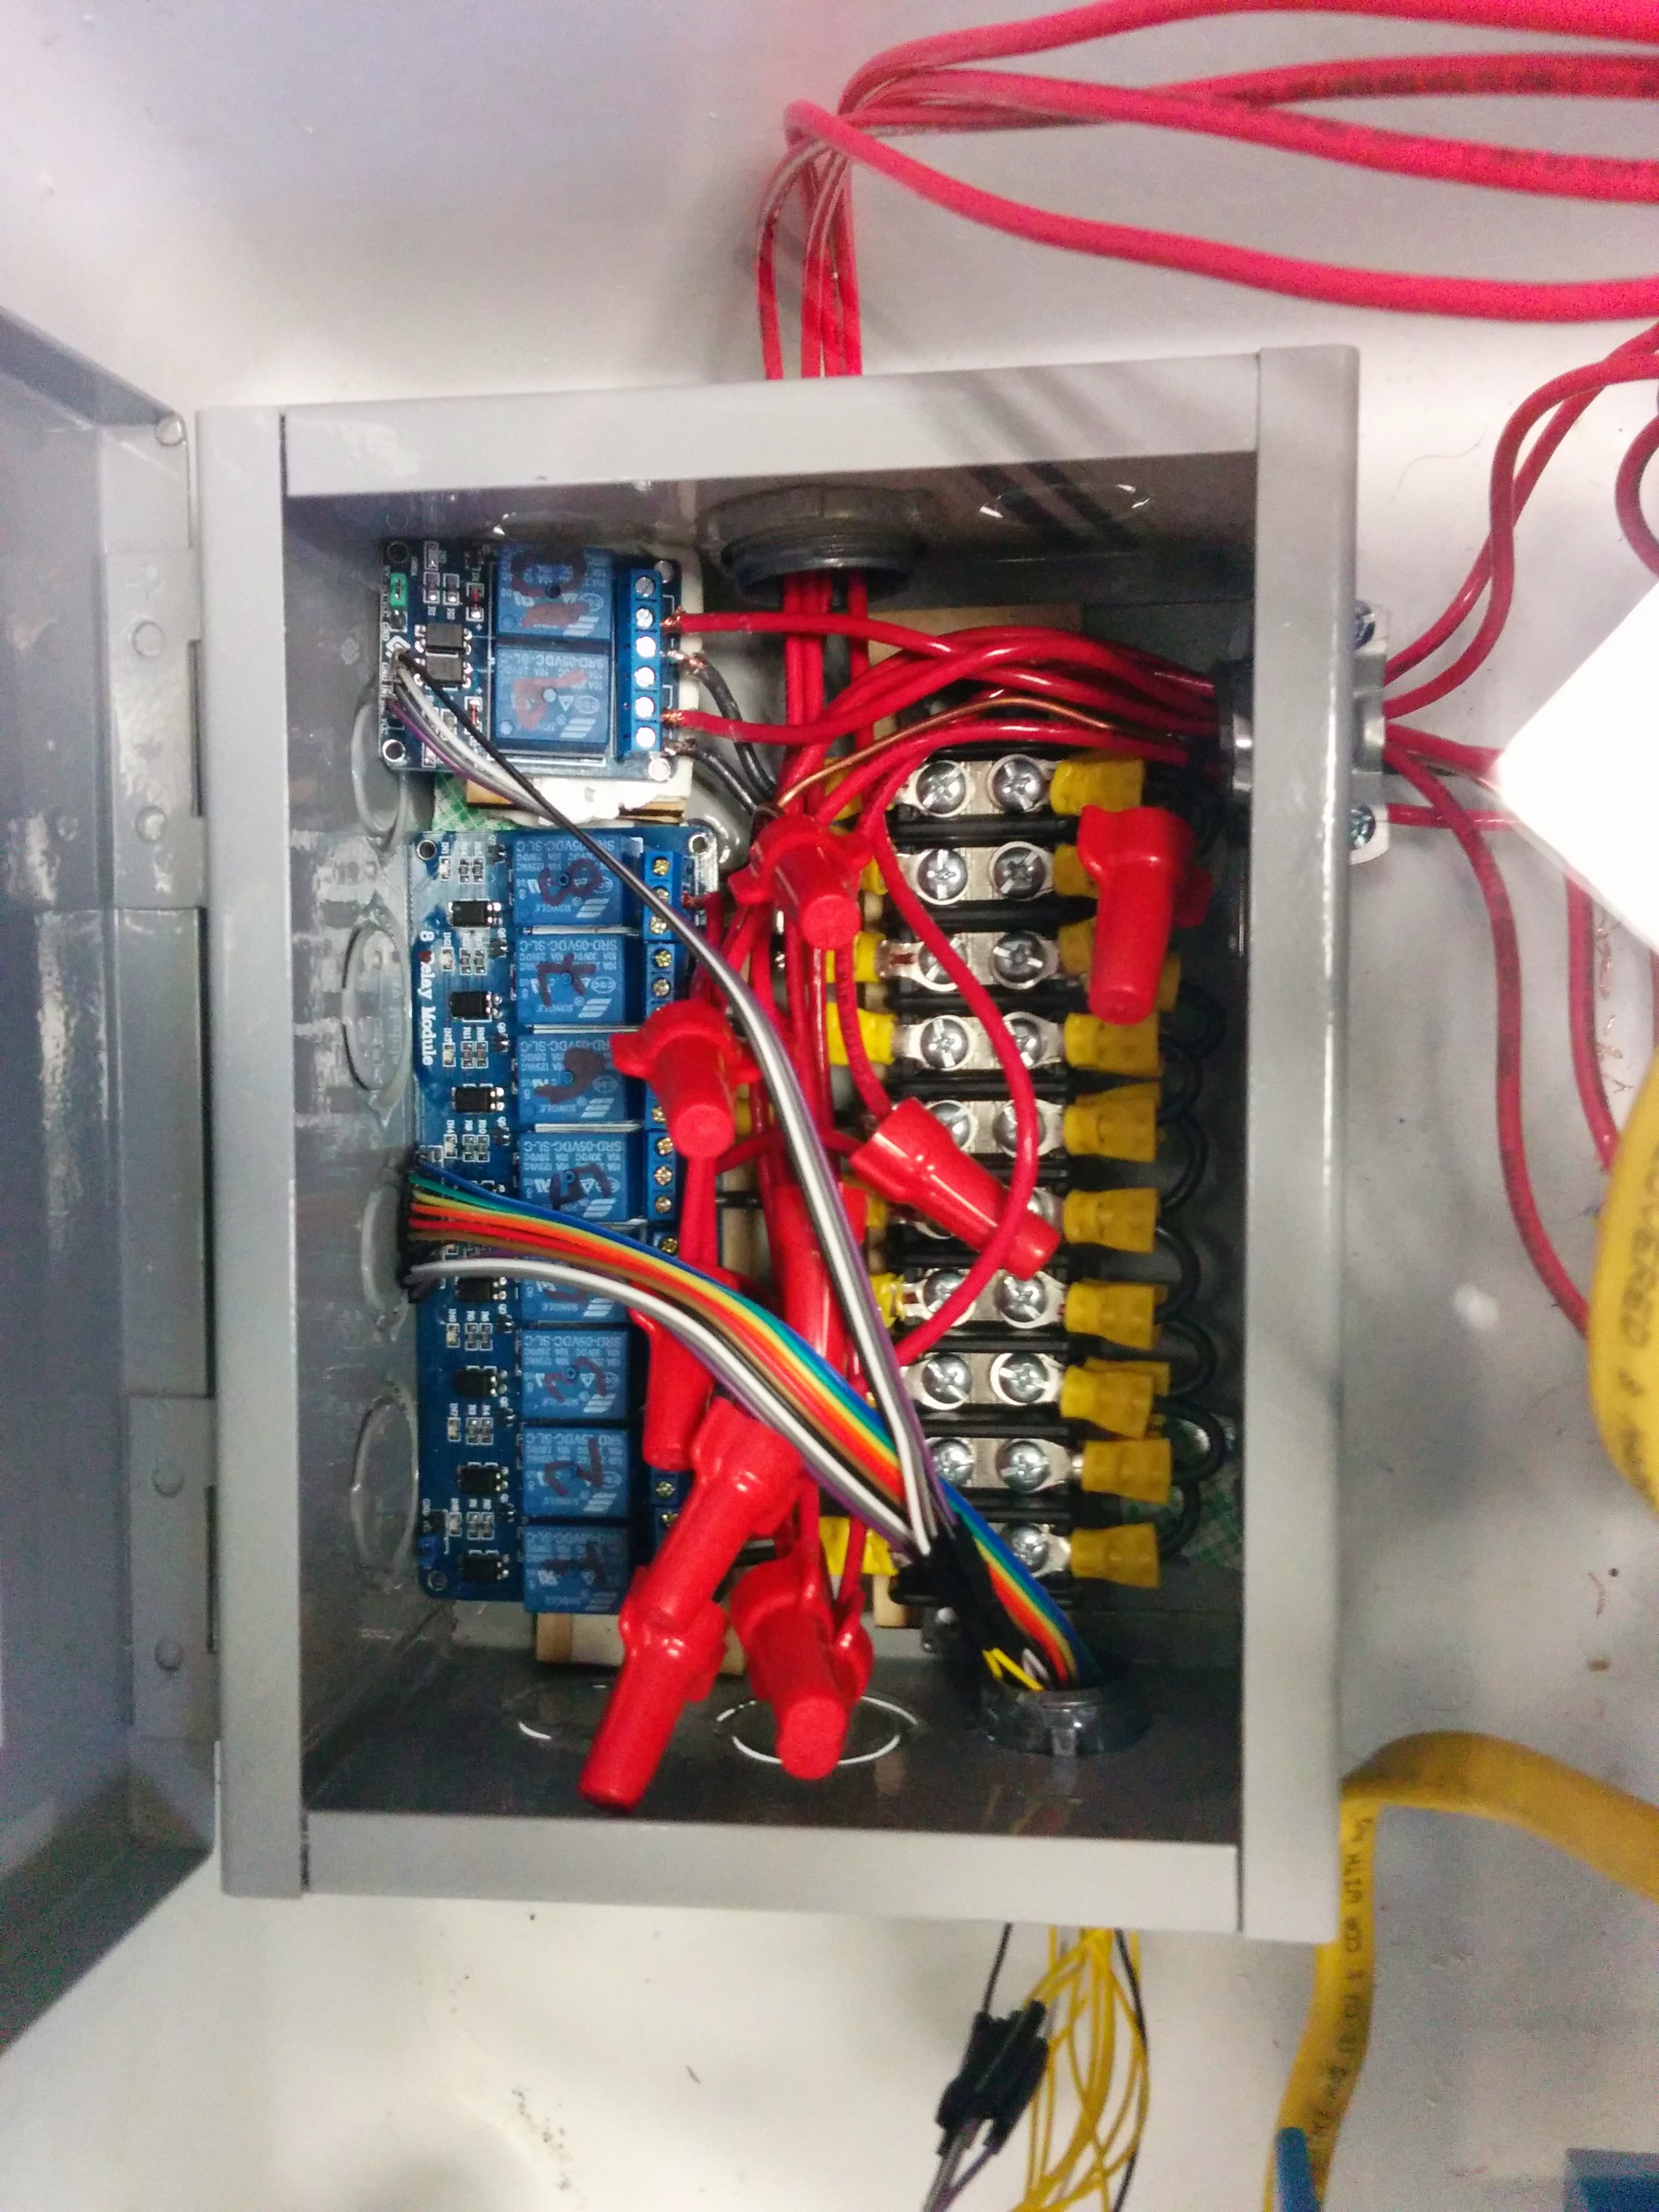
IMG_20150513_173027

We have control!

Now that everything is wired up, it’s time to run some music and lights!

Here in the Freescale MakeIt Lab we ran a full light test:

https://www.youtube.com/watch?v=20Dsus8Gr4o

(Not shown:  One of the ‘songs’ added was a music scale which was a perfect was to test out the lights!)

Stay Tuned for Part3, where we review the software and how easy it is for kids to program it!


Teensy Music!

Finally got Music and Lights program previously working on Arduino Uno ported over to the Teensy 3.1!

(Did this the night before the SuperBowl, so had the NFL on the brain).

The Teensy supports an add-on to the Arduino IDE (software editor) called Teensyduino.  This permits taking the same Arduino sketches and using them on the Teensy, in theory with no modifications!

Well in reality I did have to make a few updates to the code to get the same Arduino code to work on the Teensy, but they were generally very minor.  Here are the 3 changes I had to make:

1. Rename pins.

Pins used for LEDs and the Audio speaker output were renamed.  This just because the LEDs and speaker were simply hooked up to different pins than they were in the Arduino Uno incarnation.

int num_leds = 12; // WRITE HERE TOTAL NUMBER OF LEDS CONNECTED
int speaker_connect = 23; // WRITE HERE WHICH PIN THE SPEAKER IS CONNECTED TO
int leds[] = {22,21,20,19,18,17,16,15,14,13,12,11}; // WRITE HERE WHICH PIN THE LEDS ARE CONNECTED TO: 1, 2, 3, 4, 5 ....

Here is the pinout diagram showing the location of the pins for reference.  The LEDs can be connected to any of the digital pins (in gray, 0 to 23).  The speaker is driven by a PWM output (the ones in the darker pink).


2. Rename note #defines.

#define statements used to represent the musical note values had to be updated as there were conflicts with additional reserved terms in the Teensy core library.  The code already had to account for an Arduino conflict for the A notes, e.g. “A5” had to be renamed “AA5” as “A5” is reserved for port A, pin 5.   But the Teensyduino library also found conflict with C5, B5, etc. so all notes were given the new nomenclature, AAx (Note A), Abx (Note A flat), BBx (Note B), Bbx (Note B flat), etc.  This was an easy rename and maintains backward compatibility if I want to run it again on Arduino.

3. Turn off tone between notes.

The play_note function in my code had to be modified to turn off the tone() applied to a particular pin between notes.  The Arduino Uno library appeared to handle playing tones back to back of different frequencies no problem.  The Teensy required the addition of a noTone() call between notes for the songs to play back reliably.   To debug this I had the program do a musical scale to see what notes were having problems and it seemed to be randomly dependent on how many notes were in a song as to whether a note was played or not.  Definitely signing up on the Teensy forum (http://forum.pjrc.com) was very helpful to resolving this problem.  I also got a hint from the Arduino tone reference documentation on using noTone().  Again, this is backward compatible to running on the Arduino.

Overall I was pretty happy with how I was able to start using the Teensy almost right away with an existing Arduino sketch!

Here is the Sketch if you’re interested to try it:  

Must do more!


The Teeny, Tiny, Teensy

It’s Teeny!

It’s Tiny!

It’s a Teensy!


Speaking of little things making a big difference, I just got this little board called “Teensy” to try things on.

Here are some basic specs as compared to some popular Arduino models:

BoardTeensy 3.1Arduino Uno R3Arduino MicroArduino Nano 3.xArduino Due
ProcessorFreescale K20 (Kinetis)
Cortex-M4 (ARM) 72MHz
Atmel ATmega328
16MHz
Atmel ATmega32u4
16MHz
Atmel ATmega328
16MHz
Atmel SAM3X8E (ARM)
Cortex-M3
84MHz
Flash256kB32kB32kB32kB512kB
SRAM64kB2kB1.5kB2KB96kB
EEPROM2kB1kB1kB1kB
Digital I/O34
(12 PWM)
3.3V (5V tolerant!)
14
(6 PWM)
5V
20
(7 PWM)
5V
14
(6 PWM)
5V
54
(12 PWM)
3.3V
Analog In
(ADC)
21 (13-bit)6 (10-bit)12 (10-bit)8 (10-bit)12 (12-bit)
Analog Out
(DAC)
1 (12-bit)0002
(12-bit)
Cost$20$25$25$35$50

With its 256kB of Flash, 64kB of RAM, and 72MHz processor, it fits between an Arduino Uno and Arduino Due in capabilities, although closer to the Arduino Due, which has 512kB of RAM.  It is roughly the cost of the Arduino Uno, with almost all the capabilities of the Arduino Due!

And all that in a roughly 13mm x 36mm size board!

I see great things coming…

Yummy, yummy!

“Even better, longer lasting”

(Above: 5 Teensies in a box of gum.  Wonder what I’ll do with them??)