Happy Holidays!!

After a bit of a scramble late last week, we were able to get v1.0 of the Makerspace sign up at my sons’ middle school Friday morning!

This is the conclusion to the project I mentioned before  (Music and Lights), where an Arduino was used to drive a small speaker and some LEDs.  My initial code was done to play Imperial March (from Star Wars) and Super Mario Bros Overworld Theme.  But the kids would hopefully take it from there and make it their own.

It’s Time to Play the Music…

One of the kids with his dad’s help was able to extend my code to include many more measures of Jingle Bell Rock.   The Arduino code, written in C, was written in a way to make it easy to play any song (single tone at a time).  For example, the first line of the tune:

JBR1

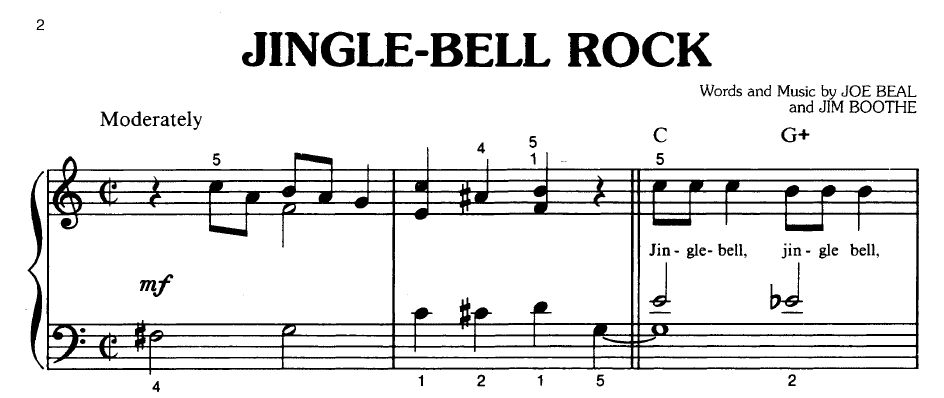
Looks like this in the code:

// Jingle Bell Rock
int bpm = 120;
int song[100][2] = {
   {R,Q},{C6,E},{AA5,E},{B5,E},{AA5,E},{G5,Q},{C6,Q},{Bb5,Q},{B5,Q},{R,Q},
      {C6,E},{C6,E},{C6,Q},{B5,E},{B5,E},{B5,Q},

Basically it’s a  2-dimensional array where the entire song is in braces { } where each ‘note’ is a pair of values indicating the note/tone and duration.  Given that it’s single tone music, generally you want to hit only the highest note for each beat to play out the tune.

There are 8.5 octaves of notes available, starting with the lowest at C0 going up through C1, C2, … C7, to the highest at C8.

All 12 pitches of the chromatic scale are represented as follows:

      Cx, Dbx, Dx, Ebx, Ex, Fx, Gbx, Gx, Abx, AAx, Bbx, Bx, …

Where x represents the octave.  NOTE: Lowest note is C0, highest is Eb8.

Note also that the A is represented here by ‘AA’ since A0, A1, etc. are reserved terms in Arduino code-land (represent names of external pins).

A rest is represented by an R (no sound).

Note durations are represented with the following symbols:

  • W = whole note
  • H = half note
  • Q = quarter note
  • E = Eighth note
  • S = Sixteenth

You can represent any other fractions of time simply by writing as an equation in the code, e.g. {C6, Q+E}.

It’s Time to Light the Lights…

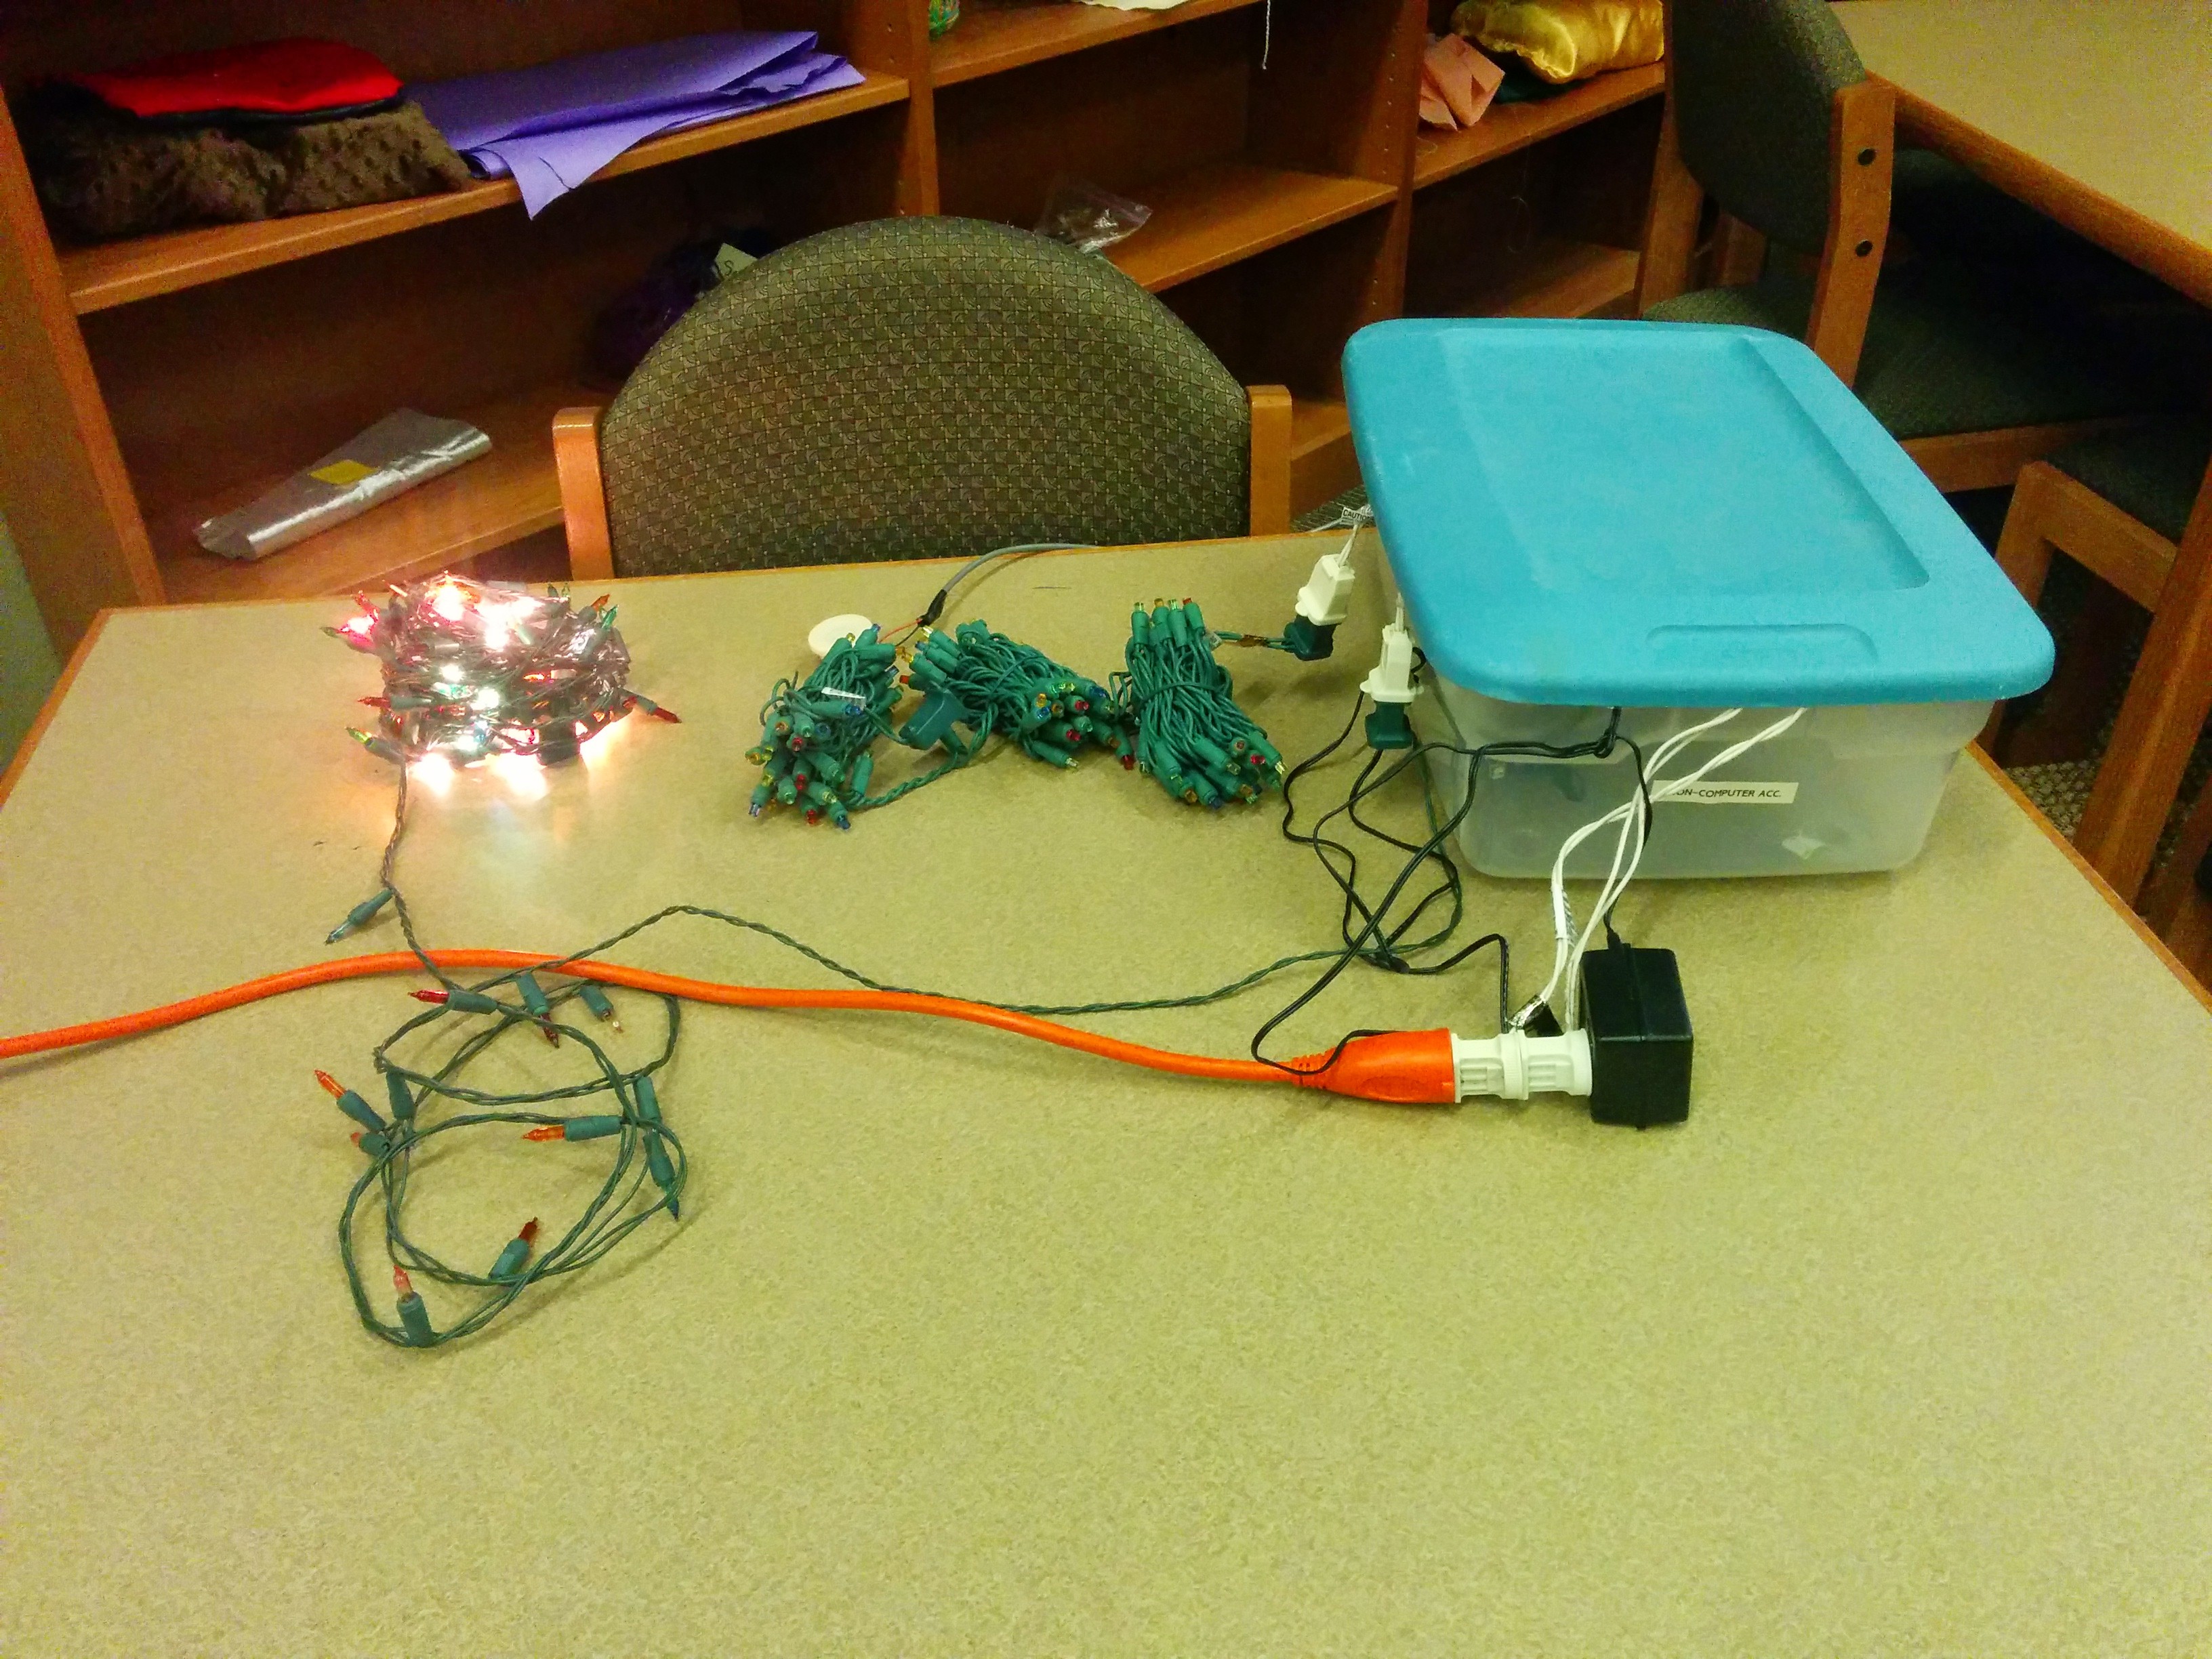
Now that we had a tune, we had to decide what our light show would look like.   We had wanted to use Christmas lights controlled by the Arduino.  I decided for simplicity to use an off the shelf relay board (SunFounder 2 channel 5V relay shield) that could be driven by the 5V Digital I/Os.

61bL8+Rf9IL._SL1000_
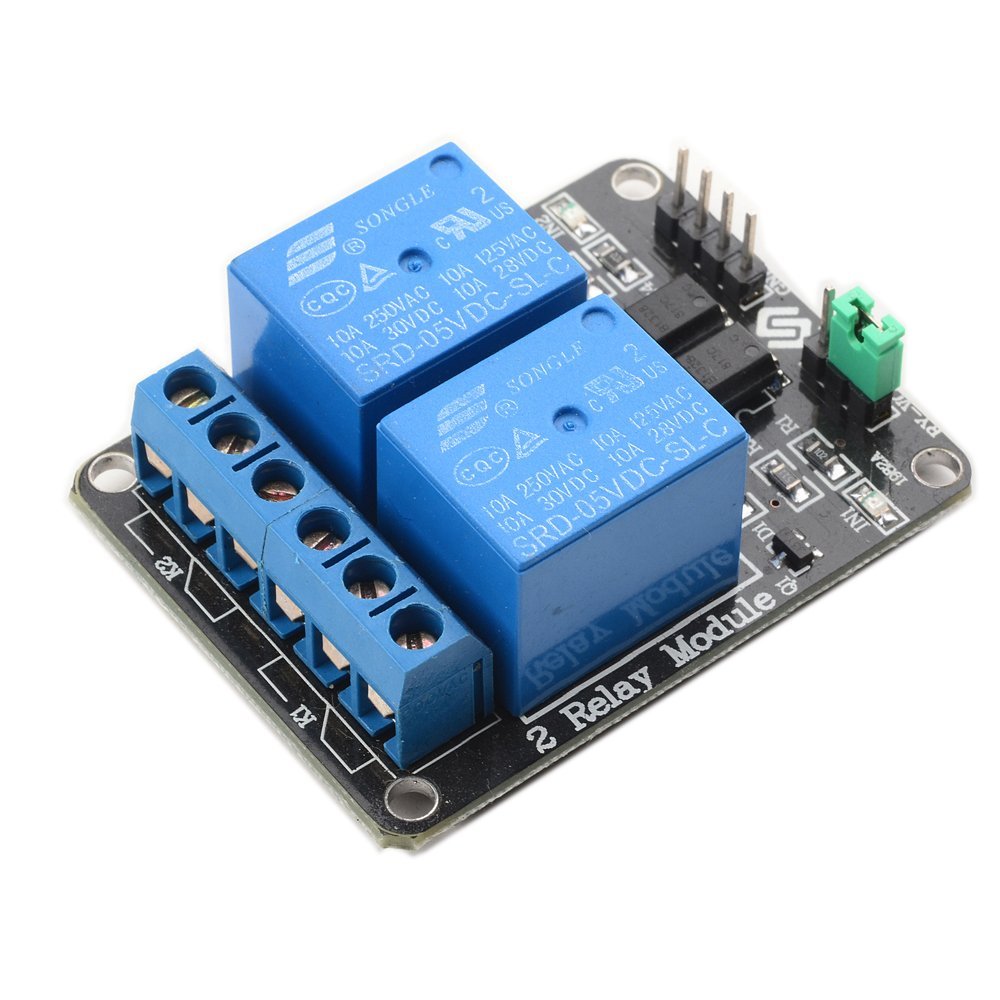
Generally you can use a relay to help you control something high-power or high-voltage like 120V AC electricity with low-voltage, low-power electronics.   Relays have been used in everything from cars to sprinkler systems, having started out from the telegraph.

We decided in the end for simplicity to use 2 sets of lights alternatively blinking for our ‘light show’.  This made my job that much easier.

Hijacking the plugs off an old strand of lights, where one of the wires goes ‘straight through’ connected via a twist-on wire connector and the other wire goes through the relay, here is the setup for controlling 1 set of lights:

IMG_20141209_003611

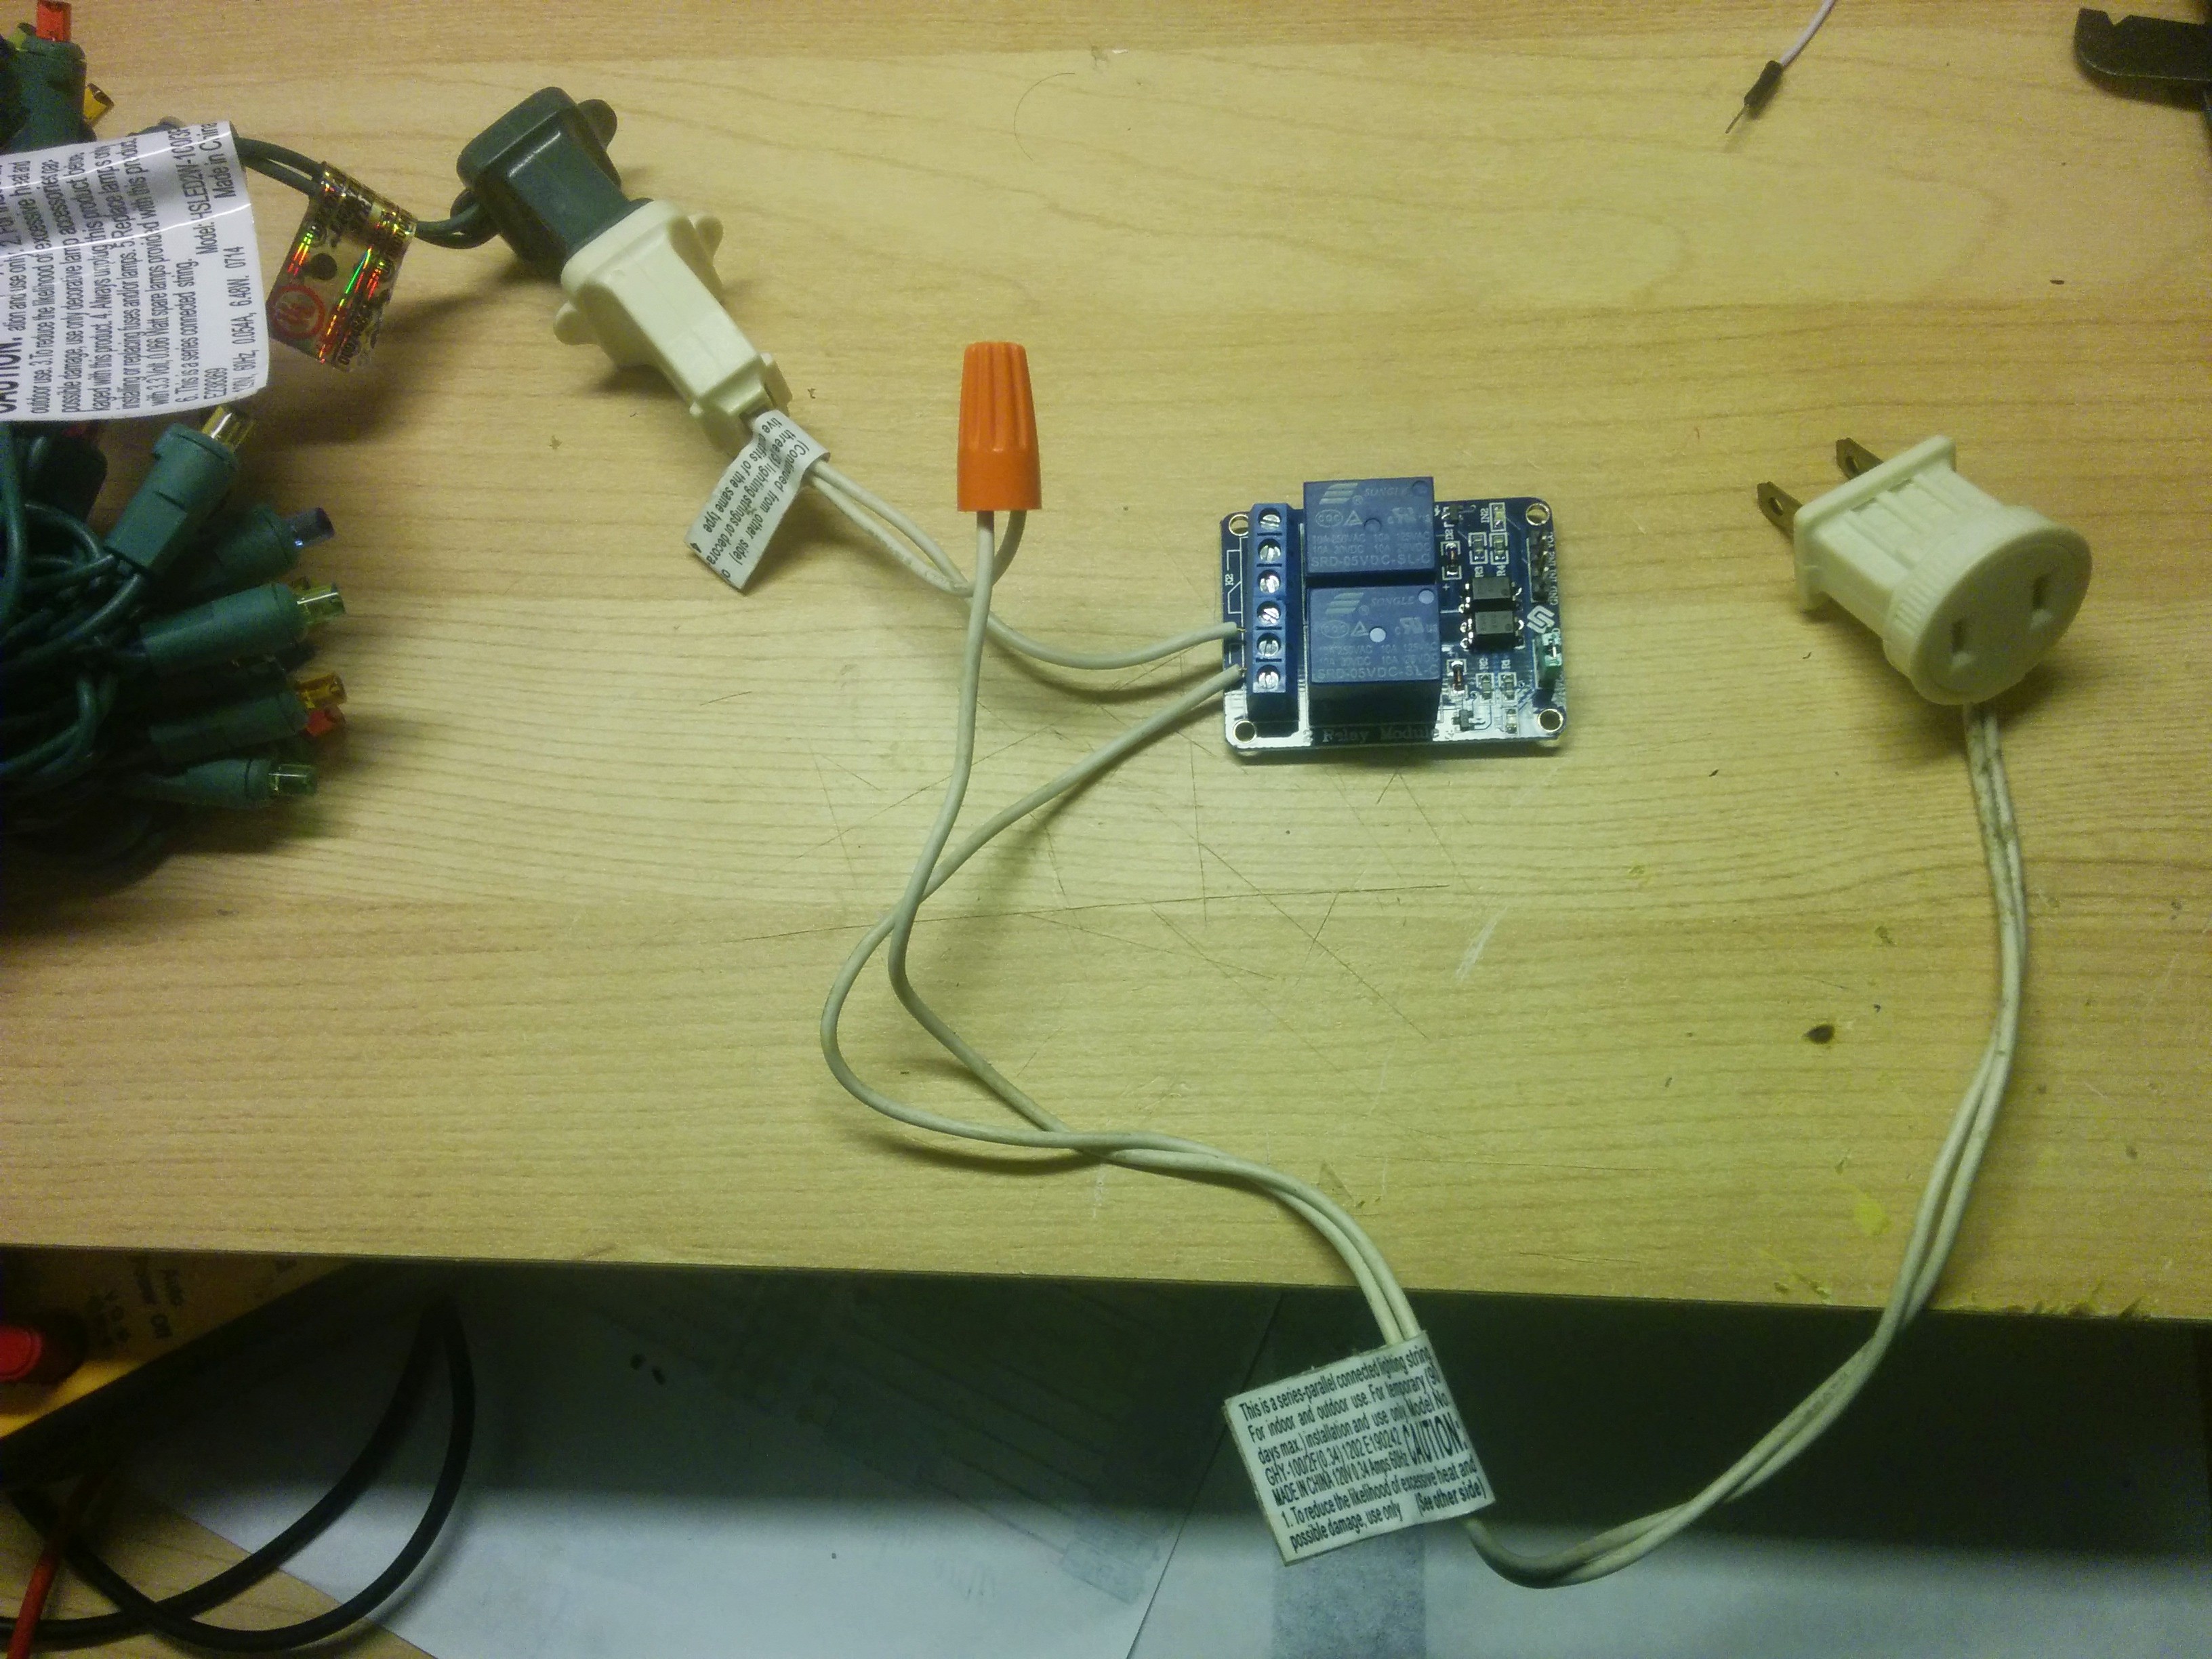
Relay set to control one string of lights.

Connecting up the Arduino to the relay involves connecting the 5V outputs previously used to drive LEDs now to drive the input lines on the relay board associated with the light strand we wanted to light.   Due to inverted logic used by the relays, instead of driving a HIGH like we did before with LEDs, the relays now would need to be driven LOW in order to ‘activate’ (connect the lights).

IMG_20141212_073755(Yes, my engineer friends will tell me that if I had connected to the ‘normally closed’ ends of the relay then I probably could have left the drive logic alone, but as a Test Engineer at Freescale who has driven relays in this way for 10+ years, old habits die hard.  Besides for safety reasons just felt that lights should be normally off when the system wasn’t powered).

With the kids we worked out roughly which notes we wanted to light which lights.

IMG_20141212_073731 IMG_20141212_073733

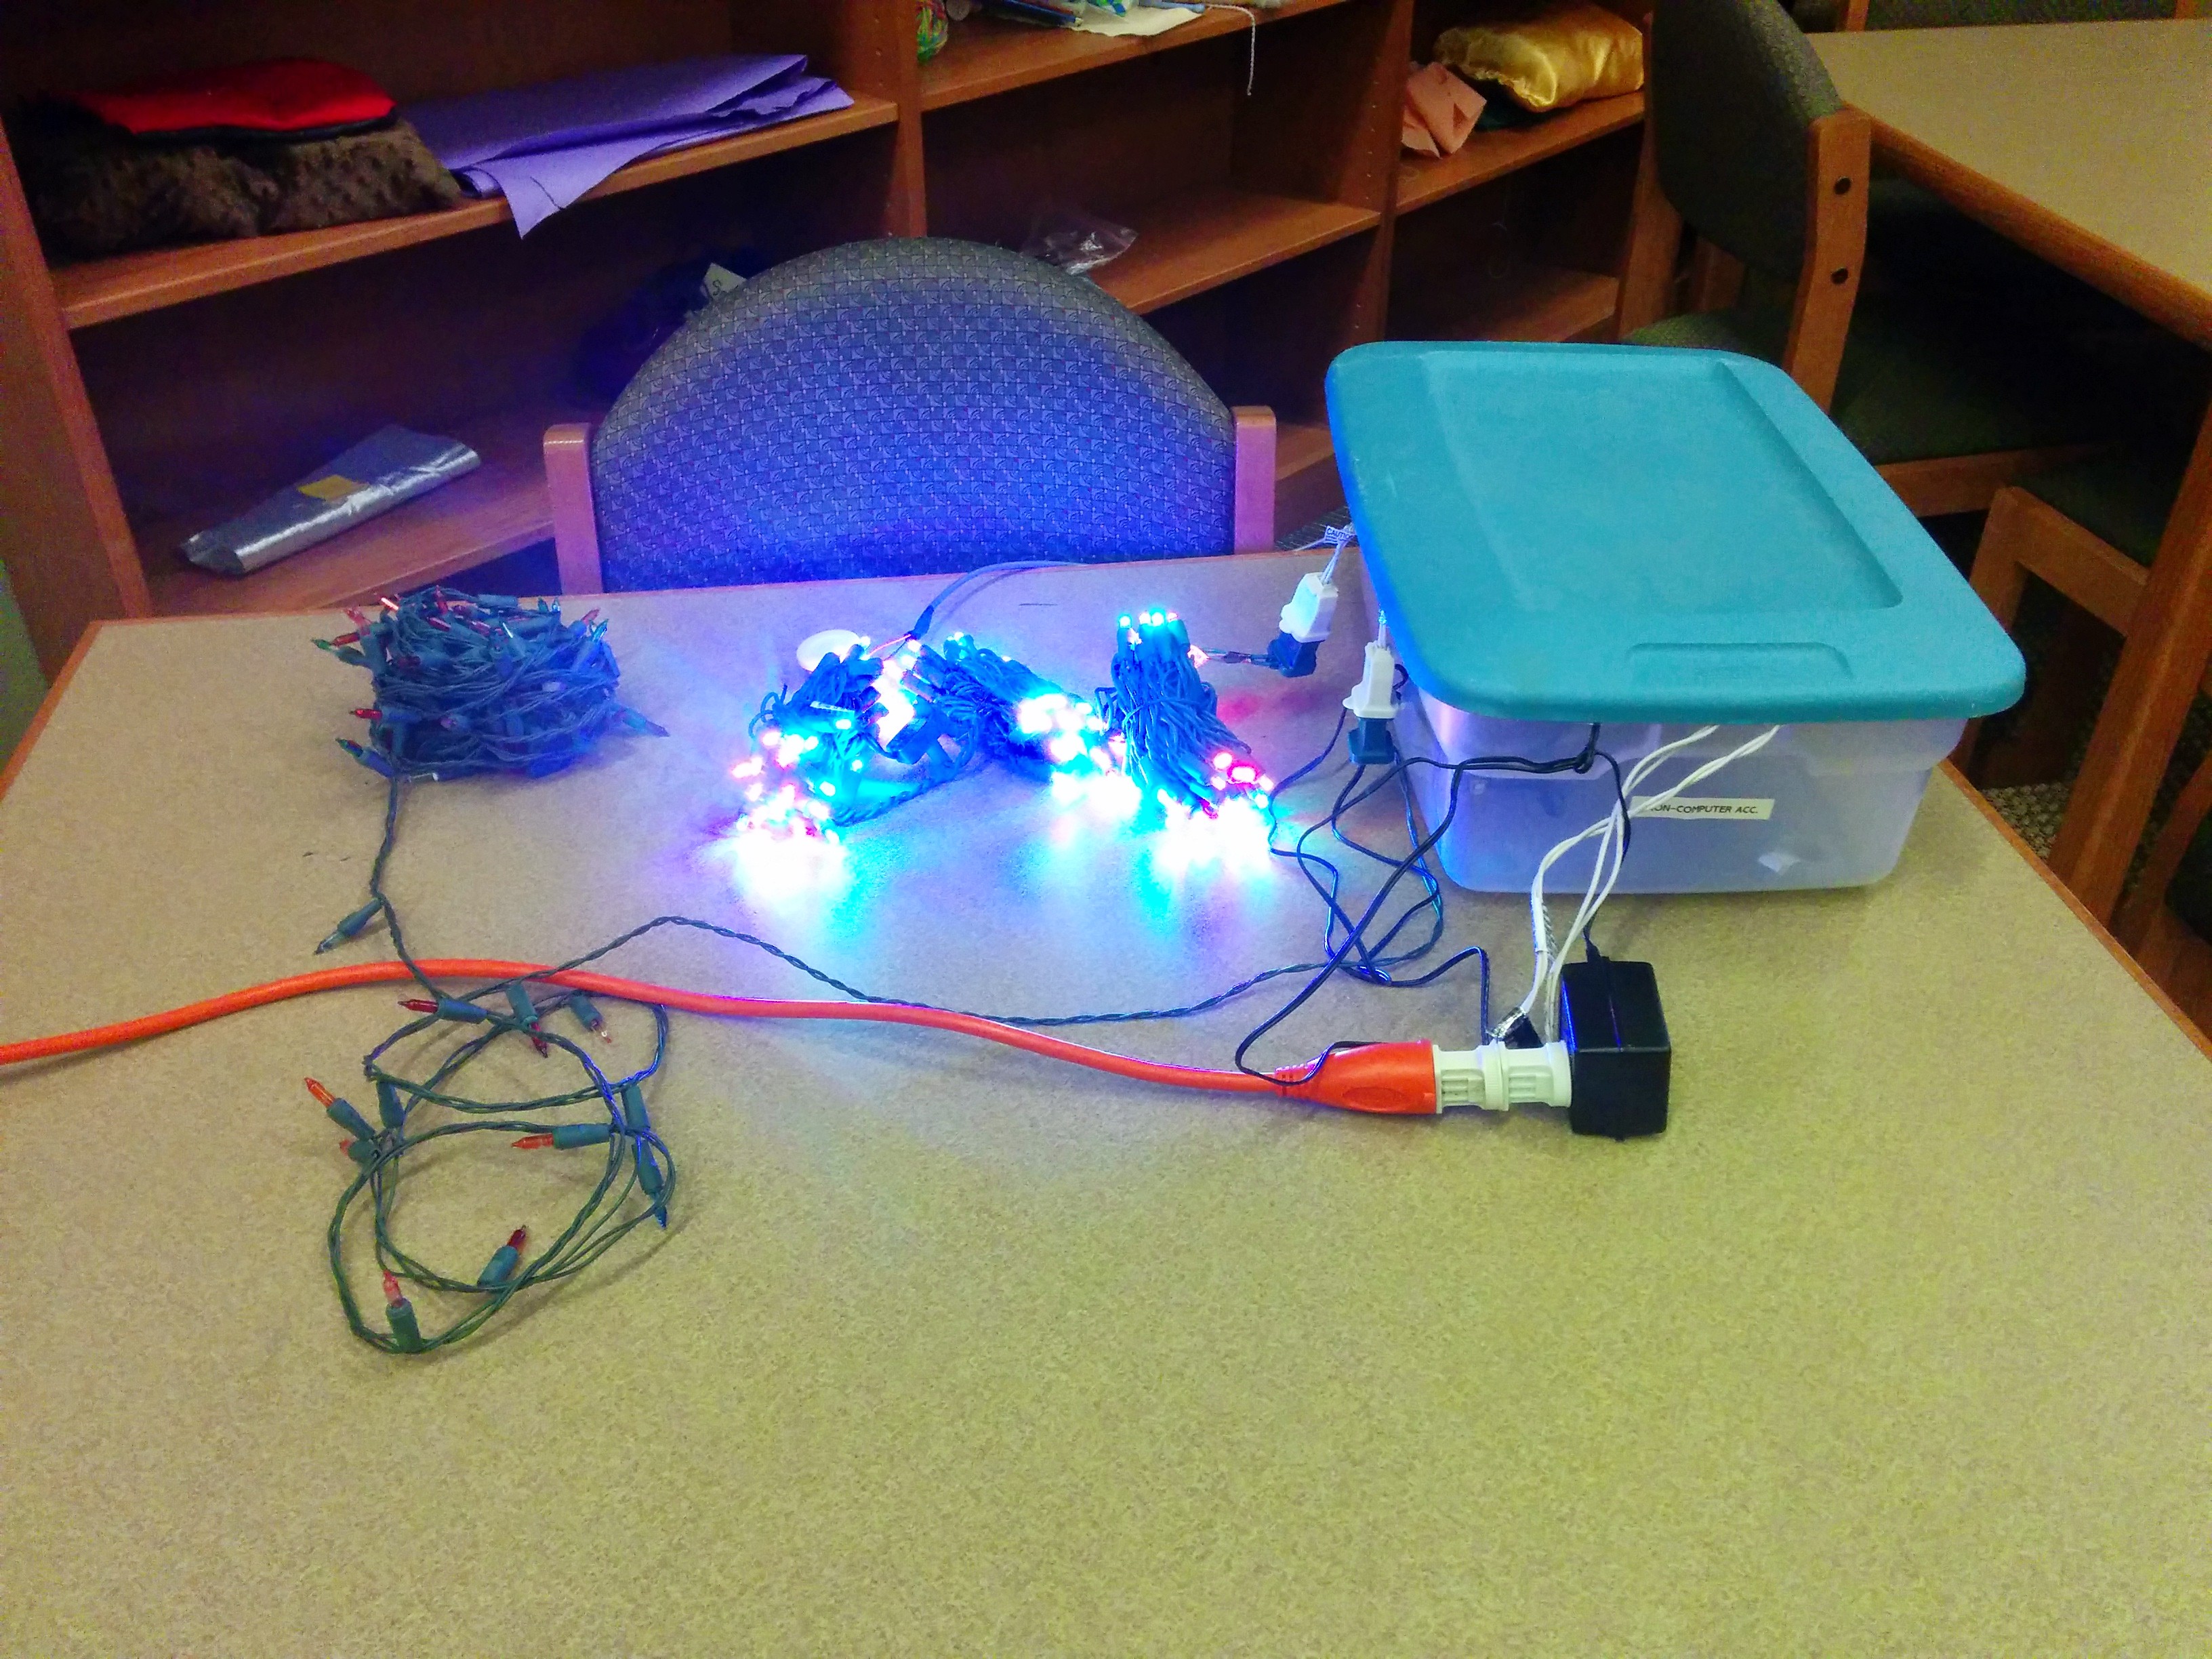
Then the kids made a couple of signs, one of which would house the Christmas lights and our holiday message.

It’s Time to Raise the Curtain…

Will share the code and hookup in a future post (stay tuned for the link).

The cool part is that hopefully with this setup we’ll be able to get the kids a bit more hands-on with the code in the spring!   Wonder what song they’ll think up to do next…

muppets5-large

Statler: That was a real wire act.
Waldorf: On this show, everything’s a wire act.
Statler: Why’s that?
Waldorf: Because, you keep asking “Wire they doing it?”

Music and Lights!

This is a little project I took on recently for my son’s afterschool Makerspace.   The goal ultimately was to do something with Christmas lights, basically having an Arduino or something drive different strings of lights in time to some music.  I would serve as tech consultant but let the kids drive the creative side, with some tech learning on the way.

So basically the project idea started from this : http://www.instructables.com/id/Arduino-Christmas-Light-Controller/.  Got the relays, got the Arduino.   I took this code and hooked it up to 8 LEDs via Arduino just to see if it worked.   Got it working.  The problem was that getting the music in sync with the lights requires you hitting play at the right moment.   Also, doing a new song would require the kids to play a song over and over and measuring the time delays to update the program.  Not exactly fun.

Found a couple more Arduino projects to consider where they used a piezo speaker to beep out a tune electronically:  http://therandombit.wordpress.com/2011/11/21/arduino-piezo-speaker-super-mario/ and http://www.instructables.com/id/How-to-easily-play-music-with-buzzer-on-arduino-Th/.    The former one had a tune I really enjoyed but I preferred the way the latter was coded up, with 8 octaves of notes, actual BPM setting.

After some code update to make it easier for the kids to do their own songs, here we go.

Basically took a piezo speaker out of an old phone handset, hooked it up to pin 11 of the Arduino via a switch (for easy turn on/off) and a potentiometer (for volume control).   I then added some code where you can assign one of the 8 LEDs to a particular note of the song, when it plays the note, it lights the LED.

Here is what I have so far:

Showed this to the kids on Thursday and they seemed to all enjoy it!   They have started coding up Jingle Bell Rock note by note.   Will keep you all posted on the progress!

Hookup and code is below.  Enjoy!

Super-Mario-Pixel-psd37077


Capture

And the code:

// From: http://www.instructables.com/id/How-to-easily-play-music-with-buzzer-on-arduino-Th/
// NB: ALL NOTES DEFINED WITH STANDARD ENGLISH NAMES, EXCEPT FOR "A"
// WHICH HERE IS CALLED "AA" BECAUSE A0,A1...ARE THE ANALOG PINS ON ARDUINO.
// (Ab IS CALLED Ab AND NOT AAb)
#define	C0 16.35
#define	Db0	17.32
#define	D0	18.35
#define	Eb0	19.45
#define	E0	20.60
#define	F0	21.83
#define	Gb0	23.12
#define	G0	24.50
#define	Ab0	25.96
#define	AA0	27.50
#define	Bb0	29.14
#define	B0	30.87
#define	C1	32.70
#define	Db1	34.65
#define	D1	36.71
#define	Eb1	38.89
#define	E1	41.20
#define	F1	43.65
#define	Gb1	46.25
#define	G1	49.00
#define	Ab1	51.91
#define	AA1	55.00
#define	Bb1	58.27
#define	B1	61.74
#define	C2	65.41
#define	Db2	69.30
#define	D2	73.42
#define	Eb2	77.78
#define	E2	82.41
#define	F2	87.31
#define	Gb2	92.50
#define	G2	98.00
#define	Ab2	103.83
#define	AA2	110.00
#define	Bb2	116.54
#define	B2	123.47
#define	C3	130.81
#define	Db3	138.59
#define	D3	146.83
#define	Eb3	155.56
#define	E3	164.81
#define	F3	174.61
#define	Gb3	185.00
#define	G3	196.00
#define	Ab3	207.65
#define	AA3	220.00
#define	Bb3	233.08
#define	B3	246.94
#define	C4	261.63
#define	Db4	277.18
#define	D4	293.66
#define	Eb4	311.13
#define	E4	329.63
#define	F4	349.23
#define	Gb4	369.99
#define	G4	392.00
#define	Ab4	415.30
#define	AA4	440.00
#define	Bb4	466.16
#define	B4	493.88
#define	C5	523.25
#define	Db5	554.37
#define	D5	587.33
#define	Eb5	622.25
#define	E5	659.26
#define	F5	698.46
#define	Gb5	739.99
#define	G5	783.99
#define	Ab5	830.61
#define	AA5	880.00
#define	Bb5	932.33
#define	B5	987.77
#define	C6	1046.50
#define	Db6	1108.73
#define	D6	1174.66
#define	Eb6	1244.51
#define	E6	1318.51
#define	F6	1396.91
#define	Gb6	1479.98
#define	G6	1567.98
#define	Ab6	1661.22
#define	AA6	1760.00
#define	Bb6	1864.66
#define	B6	1975.53
#define	C7	2093.00
#define	Db7	2217.46
#define	D7	2349.32
#define	Eb7	2489.02
#define	E7	2637.02
#define	F7	2793.83
#define	Gb7	2959.96
#define	G7	3135.96
#define	Ab7	3322.44
#define	AA7	3520.01
#define	Bb7	3729.31
#define	B7	3951.07
#define	C8	4186.01
#define	Db8	4434.92
#define	D8	4698.64
#define	Eb8	4978.03
#define R       0        // rest

// DURATION OF THE NOTES
#define H 2*Q //half 2/4
#define Q 60000/bpm //quarter 1/4  // Here assumes 4/4 time signature!
#define E Q/2   //eighth 1/8
#define S Q/4 // sixteenth 1/16
#define W 4*Q // whole 4/4
#define EE E*4/3 // slightly slow E or a quick Q

int speaker = 11;                      // WRITE HERE WHICH PIN THE SPEAKER IS CONNECTED TO
int leds[] = {6, 7, 8, 9, 2, 3, 4, 5}; // WRITE HERE WHICH PIN THE LEDS ARE CONNECTED TO:  1, 2, 3, 4, 5 ....
int num_leds = 8;                      // WRITE HERE TOTAL NUMBER OF LEDS CONNECTED

// The Imperial March
/*
int bpm = 120;      // WRITE HERE THE TEMPO OF THE SONG (BPM)
int song[100][2] = {  // WRITE HERE THE SONG IN FORMAT {{NOTE, DURATION}, {NOTE, DURATION}, ... {NOTE, DURATION}} MAX NOTES = 100
       {AA3,Q},{AA3,Q},{AA3,Q},{F3,E+S},{C4,S},{AA3,Q},{F3,E+S},{C4,S},{AA3,H},
       {E4,Q},{E4,Q},{E4,Q},{F4,E+S},{C4,S},{Ab3,Q},{F3,E+S},{C4,S},{AA3,H},
       {AA4,Q},{AA3,E+S},{AA3,S},{AA4,Q},{Ab4,E+S},{G4,S},
       {Gb4,S},{E4,S},{F4,E},{R,E},{Bb3,E},{Eb4,Q},{D4,E+S},{Db4,S},
       {C4,S},{B3,S},{C4,E},{R,E},{F3,E},{Ab3,Q},{F3,E+S},{AA3,S},
       {C4,Q},{AA3,E+S},{C4,S},{E4,H},{AA4,Q},{AA3,E+S},{AA3,S},{AA4,Q},{Ab4,E+S},{G4,S},
       {Gb4,S},{E4,S},{F4,E},{R,E},{Bb3,E},{Eb4,Q},{D4,E+S},{Db4,S},
       {C4,S},{B3,S},{C4,E},{R,E},{F3,E},{Ab3,Q},{F3,E+S},{C4,S},
       {AA3,Q},{F3,E+S},{C4,S},{AA3,H}
};
int num_notes = 70; // WRITE HERE HOW MANY NOTES IN THE SONG!
int led_notes[] = {Ab3,AA3,F3,C4,E4,F4,Gb4,G4};  //WRITE HERE WHAT NOTES TO LINK TO WHICH LEDS, MUST BE SAME NUMBER AS NUMBER OF LEDS ABOVE!
*/ 

int bpm = 100;
int song[100][2] = {
 {C6,E},{AA5,E},{B5,E},{AA5,E},{G5,Q},{AA5,Q},{Bb5,Q},{B5,Q},{R,Q},{C6,E},{C6,E},{C6,Q},{B5,E},{B5,E},{B5,Q}
};
int num_notes = 15;
int led_notes[] = {C6,AA6,B6,G5};

/*
// Super Mario Bros (1985) Overworld / Main Theme
int bpm = 240; // want slightly faster
int song[100][2] = {
       {E6,E},{E6,Q},{E6,Q},{C6,E},{E6,Q},{G6,H},{G5,H},
       {C6,Q+E},{G5,Q+E},{E5,Q+E},{AA5,Q},{B5,Q},{Bb5,E},{AA5,Q},{G5,EE},{E6,EE},{G6,EE},{AA6,Q},{F6,E},{G6,Q},{E6,Q},{C6,E},{D6,E},{B5,Q+E},
       {C6,Q+E},{G5,Q+E},{E5,Q+E},{AA5,Q},{B5,Q},{Bb5,E},{AA5,Q},{G5,EE},{E6,EE},{G6,EE},{AA6,Q},{F6,E},{G6,Q},{E6,Q},{C6,E},{D6,E},{B5,Q+E},
       {G6,E},{Gb6,E},{F6,E},{Eb6,Q},{E6,Q},{Ab5,E},{AA5,E},{C6,Q},{AA5,E},{C6,E},{D6,Q+E},{G6,E},{Gb6,E},{F6,E},{Eb6,Q},{E6,Q},{AA6,Q},{AA6,E},{AA6,H}, //60
       {G6,E},{Gb6,E},{F6,E},{Eb6,Q},{E6,Q},{Ab5,E},{AA5,E},{C6,Q},{AA5,E},{C6,E},{D6,Q+E},{Eb6,Q+S},{D6,Q+S},{C6,H}
};
int num_notes = 74;
int led_notes[] = {AA5,B5,E5,G5,C6,E6,F6,G6};
*/

void setup() {
  pinMode(speaker, OUTPUT);
  for (int i=0; i < (num_leds-1); i++) {
    pinMode(leds[i], OUTPUT);
  }
}

// turn on LED that matches note
void leds_on(int note) {
  for (int i=0; i < (num_leds-1); i++) {
    if (led_notes[i] == note) {
      digitalWrite(leds[i],HIGH);
    }
  }
}

// turn on LED that matches note, turn off all others
void leds_on_v2(int note) {
  for (int i=0; i < (num_leds-1); i++) {
    if (led_notes[i] == note) {
      digitalWrite(leds[i],HIGH);
    } else {
      digitalWrite(leds[i],LOW);
    }
  }
}

void leds_off() { // turn off all LEDs
  for (int i=0; i < (num_leds-1); i++) {
    digitalWrite(leds[i],LOW);
  }
}

void play_note(int note, long duration) {
  int blink_lights = 1;  // false

  if (blink_lights == 1) {  // Turn on LED corresponding to note, if any
     leds_on_v2(note);
  }

  if (note != R) {                 // only play if not a rest
    tone(speaker, note, duration); // http://arduino.cc/en/Reference/Tone
  }
  delay(duration);

//  if (blink_lights == 1) {  // Turn off all LEDs
//     leds_off();
//  }

  delay(1); // note separator

}

void play_song(int which_song) {
  //int len = sizeof(melody)/sizeof(int);
  for (int i=0; i < num_notes; i++) {
    play_note(song[i][0], song[i][1]);
  }
}

// the loop routine runs over and over again forever:
void loop() {
    play_song(0);
    delay(1000);
}