


MOOC
Well, I thought I’d let you all know why I’ve been a bit behind on my blog posting. One of the 2 reasons…
Early March, I decided to take an online MOOC course related to learning embedded microcontroller programming. That stands for Massive Open Online Course given online by an organization called edX that hosts various online courses given by various brick-and-mortar Universities. The course I’m taking is called Embedded Systems: Shape the World, UT.6.0.2x, hosted by the University of Texas at Austin, and is the second year of an online version of UT’s EE319K: Intro to Embedded Systems. The course is taught by Dr. Jonathan Valvano, who has several books on embedded microcontrollers, and Dr. Ramesh Yerraballi, both of whom continue to teach classes at UT Austin in the Electrical and Computer Engineering Department.
I did this to sharpen my embedded microcontroller programming skills, since when I was last in school doing this stuff the internet was still being invented (ok, made generally popular, I’m not THAT old). Anyway, I thought that this would be a great way to learn something new at night in an inexpensive way. You can take the courses for free, but you can get verified with edX for a donation (minimum $50) after which you can get course credit if you complete it in the allotted time.
The course uses the Texas Instruments TM4C123G Launchpad Eval kit, which you need to purchase to complete the course, but thankfully is relatively inexpensive at $13. I decided to go ahead and get the optional hardware for Lab 15 (Nokia 5110 84×48 LCD) and Lab 16 (CC3100 BoosterBack), in case I had time left in the ‘semester’ to do them.
I started the course a bit late so had to play a lot of late-night catch-up. The course had 16 chapter each of which generally include an online graded quiz and lab. The labs each have 2 parts: a simulated-graded portion and a real-board-graded portion. The only real deadline was that the course would close on May 13, at which point you couldn’t get additional credit for the labs or quizzes. To get course credit and certification for this particular class, you have to achieve a grade of 50%.
So I made myself a schedule for completing the labs on time that was about 4 days per chapter (vs. a week as suggested by the course profs). Most of the early chapters went quickly, however as expected the later chapters took longer. I thought I would document here some of my progress on some of the more interesting stuff I did in the labs.
Lab 10
Lab 10, shown below, is the culmination of Chapter 10 of the edX class, which focuses on learning:
- Finite State Machines, specifically a Moore FSM, which is a way to describe a system that depends on inputs and determines outputs
- Using the PLL, which is an accurate system clock with changeable frequency
- Accurate time delays using the Systick timer
The objective of the lab was to implement a traffic light intersection with cars going either Southward or Westward:
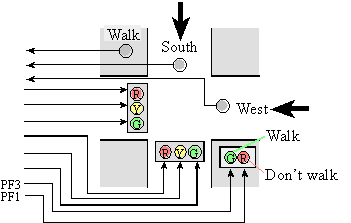
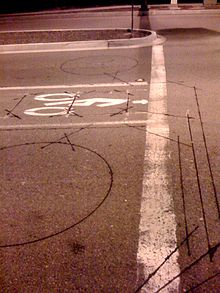
The control system looks for either a car on the Southward or Westward roads and changes the lights appropriately if a car happens to be present to let it through. Real roads have inductive loops installed under the road as shown below to detect cars, trucks and sometimes even bikes at an intersection:
The system also has a Walk/Pedestrian sensor which simulates the switch commonly seen on intersections that pedestrians push when they want to cross. For the purposes of this lab, the traffic light system does not auto-cycle the lights after a certain time as real traffic lights typically do.
As mentioned above, each lab includes a simulated and real-board grader. What this means is that the provided Lab Starter software includes code that runs to check the inputs/outputs and other various setting on the real board or on a simulated version of the board included in the software. The simulated board is very handy as it permits debugging software “offline” to validate that it works ok before trying on real hardware. In the Semiconductor world, we call this simulation-type checking work Design Verification. The same checking on the real hardware/silicon we call Design Validation.
After quite a bit of work in designing my theoretical traffic light state machine to determine the proper states and inputs and outputs, here is the final result:
https://www.youtube.com/watch?v=_mHofGXF0_o
Incidentally, the is the SECOND traffic light circuit I have built. The first I did one as a class demo for a prof at Trinity University the summer of 1993 (!), not using a microcontroller but logic gates to implement the state machine. I actually made a mock-up of a real intersection with real traffic lights. There were reed switches under the “road” that would be activated by strong magnets in toy cars. Unfortunately, I don’t have a picture so you’ll have to use your imagination. Needless to say it was pretty cool too.
In any case, I really am enjoying this online class and highly recommend it! If you’re interested, check the edX site in the Fall (Sept. 2015) as I believe the professors will give it again! They have also talked about giving another, more advanced class.
Stay tuned for more edX UT.6.0.2x Lab completion videos!